
It’s almost a given that if you own an iPhone, you use it as your camera — we certainly do. It’s convenient, yes, but it can also take some mighty fine pictures. That’s why there’s a generation of pro iPhoneographers, who travel the world taking photos (with their phones) for the world’s biggest brands. But what separates them from the rest of us with Apple handsets? Here are five key tips for making your iPhone images stand out from the crowd.
1. Shop around for your editing apps
Most of us like to add some retro styling to our iPhone imagery, but many folks stick only to Instagram or VSCO Cam. My advice? Don’t. The best iPhoneographers, such as Kevin Russ and Cole Rise, have an inventory of apps which they cycle through to get the right look for each individual scene. Ones to look out for: Afterlight, Litely and Mattebox.
2. Add lenses for a different perspective
You might think that iPhone lenses are a gimmick, but you’d be wrong — they are genuinely great for getting a different perspective. The fisheye look is probably my favorite, but telephoto lenses can also get you closer in to your subject, as shown by Dan Chung in his London Olympics photo-blog.
>> We currently have 65% off a complete kit of fisheye lenses.

3. Get to grips with Camera replacement apps
The default iOS Camera app is pretty good for most situations, and it’s quick on the draw. But if you want proper control, it’s definitely worth checking out the Camera-replacement apps around. Apps such as ProCamera and Camera+ provide DSLR-like control, making stuff like silky waterfalls and car light trails a possibility.
4. Look for (or create) favorable lighting
Great though the iPhone’s camera is, it is still a phone camera. So for best results, you need to be kind to it, which means finding good light, and not too much contrast. Foggy or overcast days are best for landscapes, while for indoor shooting it might be worth getting a proper flash.
>> The discounted the KICK LED flash might also interest you.

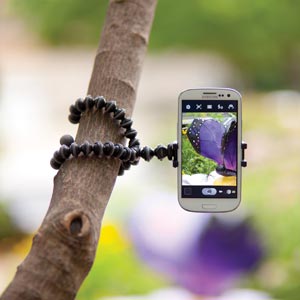
5. Use a tripod
This advice is as old as photography itself, but it still holds true. iOS does an amazing job of steadying wobbly hands, but there’s only so much it can do, especially in low light. But as carrying around a full-size tripod probably isn’t practical, try a Joby Gorillapod instead.
For other awesome accessories to your iPhone, check out these great deals:
Camera resolution features of iPhone are unbeatable. This give clue of technology heights. Well posted.
Autorizada Apple Brasilia @ Dr. Smartphone
Uhm these are not good suggestions really… Now with iOS 8 all people have to do is turn on HDR, use the focus and exposure adjustment. Shoot. Then if need edit within the iOS edit options. They have Color, brightness, B&W to auto adjust then you can open those and adjust 10 plus slides on your own. I’ve even gotten phenomenal pictures on HDR alone.